Nginx Rate Limiting Explained With Animated Gifs
One of the best features of Nginx is Rate Limiting. It helps us to prevent some attacks that aims to make our system unresponsive. Despite Nginx has a few parameters to set for rate limiting, it can be misconfigured easily. In this post, I will try to explain these options with animated gifs, and hopefully, you will have no doubts about these settings. If you want to have a background, you can read their blog post here.
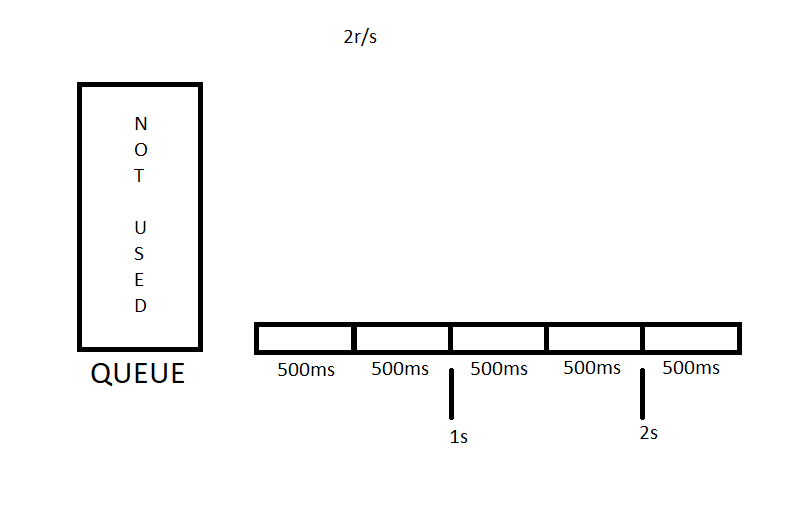
Before starting, I need to tell that Nginx tracks requests at millisecond granularity, so when you define a limit like 2r/s (two requests per second), It will be 1 request per 500 ms on Nginx side.
Let’s start talking about settings.
Defining just rate limit
I will use rate 2r/s for the sake of simplicity. In this case, only one request will be forwarded in 500ms intervals by nginx. If there are more requests in this interval they will be rejected.
Let’s make things a bit complicated 🙂
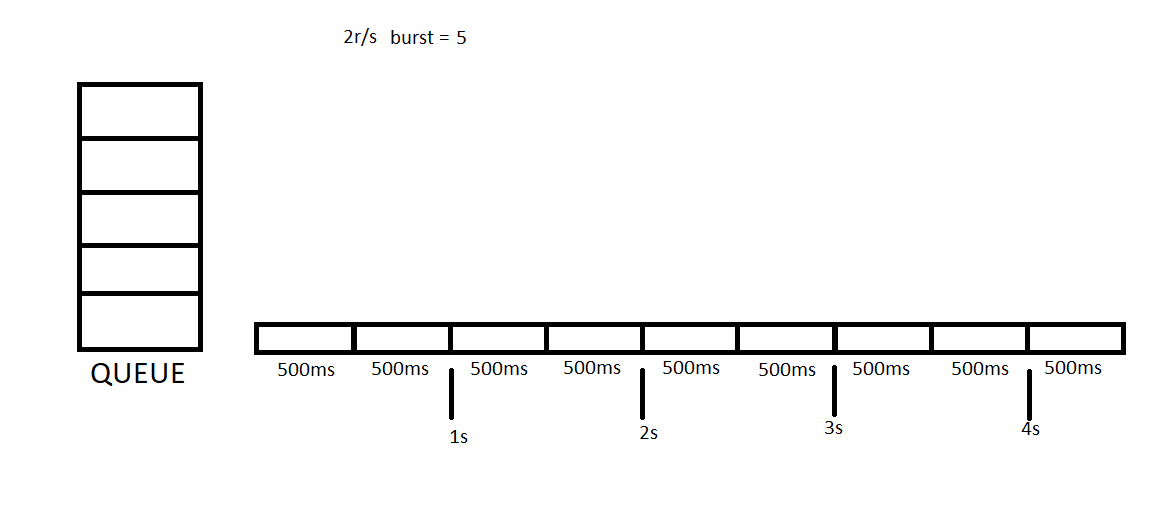
Rate limit with a burst
Sometimes It may be a bad idea rejecting all concurrent requests. We may want to create some buffer to allow getting more requests than rate limit. In this case, we need to set burst variable in our settings. Let me show you how 2r/s burst = 5 setting runs. You can think burst = 5 will create a 5 items length queue for us.
In this example we will send 7 concurrent requests first, then we will send 3 additional concurrent requests.
Rate limit with a burst and nodelay
Burst option is great for making our application more responsive but it will also make it slow. Because user will need to wait requests in queue to be completed. We can solve this problem by providing nodelay keyword. With this keyword, in queue one slot will be kept for each request but different than previous sample, requests will be forwarded immediately. In this sample, again, we will send 7 concurrent requests first then 3 additional concurrent requests.

2 stage rate limiting
We have one more very helpful option to set. 2 stage rate limiting helps us getting first requests without rejecting and applying rate limit consecutive request. This time we will provide delay = 3 setting with a burst = 5. You can think this setting as give me a queue with a 5 length but have no delay first 3 requests. After first concurrent requests, all consecutive requests will be delayed to fit rate limit we defined.

I hope this post helps you to understand nginx rate limiting better and make your applications more robust and responsive : )